Netlify CMS stores content in your GitHub, GitLab, or Bitbucket repository. In order for this to work, it must authenticate with your Git host. In most cases that requires a server. We have a few options for handling this.
Note: If you prefer to run your own authentication server, check out the section on external OAuth clients.
Note: Some static site generators have plugins for optimized integration with Netlify CMS, and starter templates may utilize these plugins. If you’re using a starter template, read the template documentation before proceeding, as their instructions may differ.
Git Gateway with Netlify Identity
Git Gateway is a Netlify open source project that allows you to add editors to your site CMS without giving them direct write access to your GitHub or GitLab repository. (For Bitbucket repositories, use the Bitbucket backend instead.) The Netlify Identity service can handle the authentication and provides a simple interface for user management. The Netlify CMS featured templates are working examples of this backend.
To use it in your own project stored on GitHub or GitLab, follow these steps:
- Head over to the Netlify Identity docs and follow the steps to get started.
- Add the following lines to your Netlify CMS
config.yml file:
backend:
name: git-gateway
accept_roles:
- admin
- editor
- Optionally, you can assign roles to users in your Netlify dashboard, and then limit which roles can access the CMS by defining the
accept_roles field as shown in the example above. Otherwise accept_roles can be left out, and all Netlify Identity users on your site have access.
Reconnect after Changing Repository Permissions
If you change ownership on your repository, or convert a repository from public to private, you may need to reconnect Git Gateway with proper permissions. Find further instructions in the Netlify Git Gateway docs.
Git Gateway without Netlify
You can use Git Gateway without Netlify by setting up your own Git Gateway server and connecting it with your own instance of GoTrue (the open source microservice that powers Netlify Identity), or with any other identity service that can issue JSON Web Tokens (JWT).
To configure in Netlify CMS, use the same backend settings in your Netlify CMS config.yml file as described in Step 2 of the Git Gateway with Netlify Identity instructions above.
GitHub Backend
For repositories stored on GitHub, the github backend allows CMS users to log in directly with their GitHub account. Note that all users must have push access to your content repository for this to work.
Because Github requires a server for authentication, Netlify facilitates basic GitHub authentication.
To enable basic GitHub authentication:
- Follow the authentication provider setup steps in the Netlify docs.
- Add the following lines to your Netlify CMS
config.yml file:
backend:
name: github
repo: owner-name/repo-name
Specifying a status for deploy previews
The GitHub backend supports deploy preview links. Netlify CMS checks the context of a commit’s statuses and infers one that seems to represent a deploy preview. If you need to customize this behavior, you can specify which context to look for using preview_context:
```yaml
backend:
  name: github
  repo: my/repo
  preview_context: my-provider/deployment
```
The above configuration would look for the status who’s "context" is "my-provider/deployment".
GitLab Backend
For repositories stored on GitLab, the gitlab backend allows CMS users to log in directly with their GitLab account. Note that all users must have push access to your content repository for this to work.
The GitLab API allows for two types of OAuth2 flows:
- Web Application Flow, which works much like the GitHub OAuth flow described above.
- Implicit Grant, which operates without the need for an authentication server.
Web Application Flow with Netlify
When using GitLab’s Web Application Flow for authentication, you can use Netlify to handle the server-side authentication requests.
To enable it:
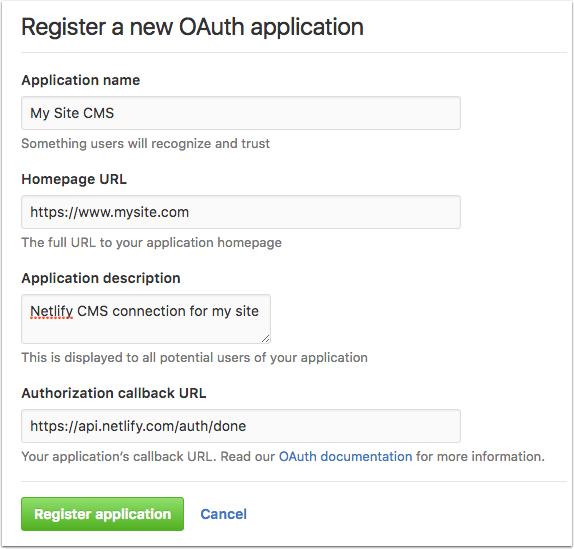
- Follow the GitLab docs to add your Netlify CMS instance as an OAuth application. For the Redirect URI, enter
https://api.netlify.com/auth/done, and check the box for api scope.
- Follow the Netlify docs to add your new GitLab Application ID and Secret to your Netlify site dashboard.
- In your repository, add the following lines to your Netlify CMS
config.yml file:
backend:
name: gitlab
repo: owner-name/repo-name
Client-Side Implicit Grant (GitLab)
With GitLab’s Implicit Grant, users can authenticate with GitLab directly from the client. To do this:
- Follow the GitLab docs to add your Netlify CMS instance as an OAuth application. For the Redirect URI, enter the address where you access Netlify CMS, for example,
https://www.mysite.com/admin/. For scope, select api.
- GitLab gives you an Application ID. Copy this ID and enter it in your Netlify CMS
config.yml file, along with the following settings:
backend:
name: gitlab
repo: owner-name/repo-name
auth_type: implicit
app_id: your-app-id
You can also use Implicit Grant with a self-hosted GitLab instance. This requires adding api_root, base_url, and auth_endpoint fields:
backend:
name: gitlab
repo: owner-name/repo-name
auth_type: implicit
app_id: your-app-id
api_root: https://my-hosted-gitlab-instance.com/api/v4
base_url: https://my-hosted-gitlab-instance.com
auth_endpoint: oauth/authorize
Note: In both cases, GitLab also provides you with a client secret. You should never store this in your repo or reveal it in the client.
Bitbucket Backend
For repositories stored on Bitbucket, the bitbucket backend allows CMS users to log in directly with their Bitbucket account. Note that all users must have write access to your content repository for this to work.
To enable it:
- Follow the authentication provider setup steps in the Netlify docs.
- Add the following lines to your Netlify CMS
config.yml file:
backend:
name: bitbucket
repo: owner-name/repo-name
Client-Side Implicit Grant (Bitbucket)
With Bitbucket’s Implicit Grant, users can authenticate with Bitbucket directly from the client. To do this:
- Follow the authentication provider setup steps in the Netlify docs, make sure you allow ‘Account/Read’ and ‘Repository/Write’.
- Bitbucket gives you a Key. Copy this Key and enter it in your Netlify CMD
config.yml file, along with the following settings:
backend:
name: bitbucket
repo: owner-name/repo-name
branch: default
auth_type: implicit
app_id:
Warning: With Bitbucket implicit grant, the authentication is valid for 1 hour only. After that, the user has to login again, which can lead to data loss if the expiration occurs while content is being edited.
Test Repo Backend
You can use the test-repo backend to try out Netlify CMS without connecting to a Git repo. With this backend, you can write and publish content normally, but any changes will disapear when you reload the page. This backend powers the Netlify CMS demo site.
To enable this backend, add the following lines to your Netlify CMS config.yml file:
External OAuth Clients
If you would like to facilitate your own OAuth authentication rather than use Netlify’s service or implicit grant, you can use one of the community-maintained projects below. Feel free to submit a pull request if you’d like to add yours!
| Author |
Supported Git hosts |
Language(s)/Platform(s) |
Link |
| @vencax |
GitHub, GitHub Enterprise |
Node.js |
Repo |
| @igk1972 |
GitHub, GitHub Enterprise |
Go |
Repo |
| @davidejones |
GitHub, GitHub Enterprise |
Python |
Repo |
| @marcelkornblum |
GitHub, GitHub Enterprise |
Google AppEngine with Python |
Repo |
| @marksteele |
GitHub, GitHub Enterprise |
Serverless |
Repo, Blog |
| @Herohtar |
GitHub, GitHub Enterprise |
Firebase Cloud Function |
Repo |
Check each project’s documentation for instructions on how to configure it.
Options
Netlify CMS backends allow some additional fields for certain use cases. A full reference is below. Note that these are properties of the backend field, and should be nested under that field.
| Field |
Default |
Description |
repo |
none |
Required for github, gitlab, and bitbucket backends; ignored by git-gateway. Follows the pattern [org-or-username]/[repo-name]. |
accept_roles |
none |
git-gateway only. Limits CMS access to your defined array of user roles. Omitting this field gives access to all registered users. |
branch |
master |
The branch where published content is stored. All CMS commits and PRs are made to this branch. |
api_root |
https://api.github.com (GitHub), https://gitlab.com/api/v4 (GitLab), or https://api.bitbucket.org/2.0 (Bitbucket) |
The API endpoint. Only necessary in certain cases, like with GitHub Enterprise or self-hosted GitLab. |
site_domain |
location.hostname (or cms.netlify.com when on localhost) |
Sets the site_id query param sent to the API endpoint. Non-Netlify auth setups will often need to set this for local development to work properly. |
base_url |
https://api.netlify.com (GitHub, Bitbucket) or https://gitlab.com (GitLab) |
OAuth client hostname (just the base domain, no path). Required when using an external OAuth server or self-hosted GitLab. |
auth_endpoint |
auth (GitHub, Bitbucket) or oauth/authorize (GitLab) |
Path to append to base_url for authentication requests. Optional. |