How to properly manage and understand your DNS zone?

Are your SSL certificates not activating? Are your emails being blocked?… You might need to look at your DNS zone. To do this, you need to understand its purpose and functions.

Understanding My DNS Zone

When you want to access a website, you connect to a domain name. For example, webo-facto.com, google.fr, wikipedia.org—the name you type into your browser.

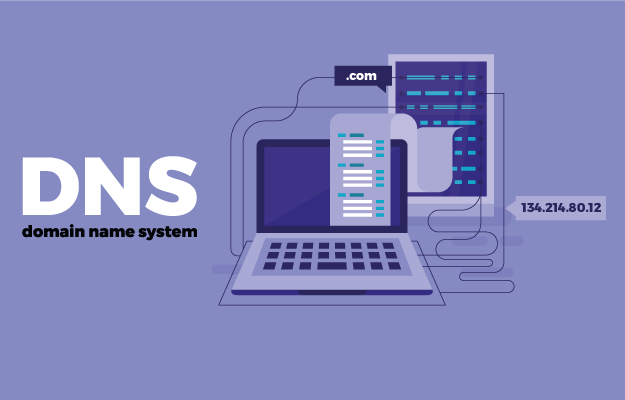
However, the browser needs to know not only the domain name but also which server to connect to; and therefore, the IP address of the server from which it will retrieve the web pages.

An IP address is simply an identification number assigned to each device connected to the internet; it’s a string of numbers.

For us, it would be complicated to remember each string of numbers, which is why we assign domain names.

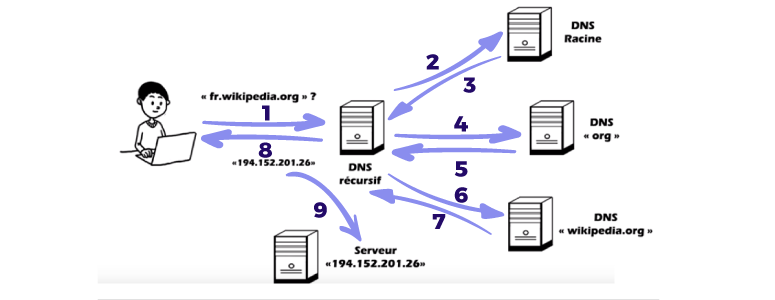
This is where the DNS (Domain Name System) comes in; it translates the domain name into an IP address. But DNS can also link a domain name to other web functionalities such as email, another domain name, etc.

In short, DNS servers are simply responsible for matching and translating a domain name into an IP address or other records.

Note: A domain name can have multiple DNS zones with different registrars (Webo, OVH, etc.), but only one will be active.

Within a DNS zone, you can find different types of records. The main ones are: NS, A, CNAME, MX, and TXT.

The NS record acts as the “switch” that determines which DNS zone should be active.

The A record is MANDATORY for publishing a website; it links the domain name to the server hosting the site. This is where you enter the IP address.

The CNAME record is similar, except it points to another domain name, not a server. For example, a .fr domain to a .com domain, or all subdomains to the main domain.

The MX record specifies which email account to use, depending on the registrar hosting the email account.

Finally, the TXT record. It’s the Swiss Army knife of DNS records. It has many features, including:

  • SPF sets rules for sending emails. For example, for a contact form to send emails to a server, you must tell SPF that the server authorizes sending.

  • TXT can also include a string of characters useful for certain external web services. The most common example is for companies that offer third-party solutions. Indeed, sometimes to connect their solutions to the website, you either have to upload a file to the FTP server or create a TXT record, which is mandatory in both cases to prove that you own the website.

How do I manage my DNS zone?

There are two ways to manage your DNS zone.

The first, if the domain name’s DNS zone is directly managed by a registrar (e.g., OVH), is to use a DNS tab where you can enter each record. The second is by creating and modifying it directly on the Webo-facto platform.

For your information, TTL (Time To Live) is the time it takes for the record to be sent, not the time it takes to become visible and active.

To see which DNS servers are active, log in to DIGWEBINTERFACE.COM.
Process:

1) Hostname: Enter the domain name(s) (one per line)
2) Type: Any
3) Click the DIG button

WP Reset: a plugin to reset, restore, and give your site a fresh look

If you’re a WordPress developer or looking for an easy solution for your numerous tests, WP Reset might be the plugin you need. It will save you valuable time.

WP Reset is a WordPress plugin that helps you build and repair WordPress sites faster by allowing you to install plugins in bulk. It lets you reset your entire WordPress site or just a portion of it.

WP Reset has a web app. This app features a comprehensive dashboard for managing sites and licenses. From there, you can activate additional features and download snapshots of each site.

Reset your WordPress site in one click

Whenever you need to install a new WordPress site, stop wasting time creating a database, downloading WordPress files, etc. The “reset” feature will reset your site in seconds.

In a way, you can reuse/recycle your old test sites. This feature requires no technical knowledge; just click.

However, be careful, as this is irreversible.

With each reset, it’s advisable to save a snapshot to avoid losing anything and to revert to the same state if a problem arises. All saved snapshots are available in the Snapshots tab, and you can restore any version at any time.

Plugin and Theme Collections

These collections allow you to gather the most reliable plugins and themes to activate on any site with a single click.

This will save WordPress site creators (and therefore not just developers) a lot of time. This feature will work after resetting the site or creating a new one from scratch.

A lifetime access tool for under $49

WP Reset is a paid tool. Currently, several special offers are available on AppSumo, allowing you to use the tool for life at a low price. There are three plans:

  1. Single plan at $49 (down from $299) allows you to use WP Reset on 10 sites, offers lifetime access to the WP Reset cloud for 5 sites, 2 GB of lifetime cloud storage per site, and 10 GB of total storage.
  2. Double plan at $98 (down from $598) allows you to connect 50 sites, provides lifetime access to the WP Reset cloud for 10 sites, 2 GB of lifetime cloud storage per site, and 20 GB of total storage.
  3. Finally, for $147, WP Reset can be used on 100 sites, includes lifetime cloud access for 15 sites, and 30 GB of storage.

WP Reset is certainly highly sought after by WordPress developers. And there are many, judging by the number of active installations this plugin boasts: over 100,000 to date!

If you use it, feel free to share your opinion or leave us feedback in the comments.

Analyzing Social Media Analytics to Improve Your Online Presence

Social media analytics play a crucial role in understanding and enhancing your online presence. By analyzing data from various social media platforms, you can gain valuable insights into audience behavior, content performance, and overall engagement levels. This article will delve into the importance of social media analytics and how you can use them to improve your online presence.

One of the key benefits of social media analytics is the ability to track and measure the effectiveness of your online efforts. By monitoring metrics such as likes, shares, comments, and click-through rates, you can assess which content resonates with your audience and which strategies are yielding the best results. This data-driven approach allows you to make informed decisions about your social media marketing tactics and optimize them for maximum impact.

Additionally, social media analytics can provide valuable demographic information about your audience, including their age, gender, location, and interests. By gaining insights into your target market, you can tailor your content to better meet their needs and preferences, increasing engagement and building a loyal following. Understanding who your audience is and what they respond to can help you create more relevant and impactful content that resonates with your followers.

Furthermore, social media analytics can help you identify trends and patterns in audience behavior, allowing you to anticipate changes and stay ahead of the curve. By staying informed about industry trends and competitor activities, you can adjust your strategies accordingly and position yourself as a leader in your niche. This proactive approach to social media management can help you stay competitive and relevant in a rapidly evolving digital landscape.

In conclusion, analyzing social media analytics is essential for improving your online presence and maximizing the impact of your social media marketing efforts. By leveraging data-driven insights, you can better understand your audience, optimize your content strategies, and stay ahead of the curve in a competitive online market.

Essential Tools for Creating Impactful Social Media Ads

In today’s digital landscape, social media has become a powerful platform for businesses to reach their target audience. With the right tools, creating impactful social media ads can be a game-changer for your marketing strategy. From eye-catching visuals to compelling copy, there are several essential tools that can help you enhance the effectiveness of your social media ads.

One of the most important tools for creating impactful social media ads is a design software like Canva or Adobe Creative Suite. These platforms offer a wide range of templates, fonts, and graphics that can help you create visually appealing ads that stand out in a crowded feed. Additionally, tools like Unsplash or Pexels provide access to high-quality stock images that can elevate the overall look of your ads.

Another essential tool for social media ads is a scheduling platform like Hootsuite or Buffer. These tools allow you to plan and schedule your ads in advance, ensuring that they are published at the optimal times for maximum engagement. Furthermore, analytics tools like Google Analytics or Facebook Insights can help you track and measure the performance of your ads, providing valuable insights for future campaigns.

When it comes to writing impactful ad copy, tools like Grammarly can help you ensure that your messaging is clear, concise, and error-free. Additionally, A/B testing tools like Optimizely can help you experiment with different ad variations to find the most effective messaging for your target audience.

Key aspects of social media’s role in modern marketing include:
  • Direct Customer Engagement: It provides a direct line to consumers, fostering deeper relationships and enabling tailored customer service.
  • Targeted Advertising: Businesses can use Forbes (2024) and similar platforms to reach specific demographics, interests, and behaviors, maximizing return on investment.

The Importance of Social Media in Today’s Digital Landscape

Social media marketing has transformed the way businesses interact with their audiences. Unlike traditional forms of advertising, social media platforms offer an interactive and engaging space where businesses can communicate directly with their customers, foster meaningful conversations, and gather insights into consumer behavior. Here are a few reasons why social media is so important for businesses today:

Increased Brand Awareness: With millions of active users on social platforms, businesses can reach a wide and diverse audience. A well-executed social media marketing strategy ensures that your brand is seen by users who might never have discovered your business otherwise. Whether you’re in web development, marketing, or the service industry, platforms like LinkedIn, Twitter, and Facebook allow you to build a brand identity that resonates with your target audience.

Increased Customer Engagement: Social media gives businesses the opportunity to engage directly with their audience. This engagement can take many forms, including responding to customer comments, participating in discussions, conducting polls, or sharing interactive content such as live videos with the help of a software development company. Interacting with customers helps foster brand loyalty and can turn casual visitors into long-term clients.

Cost-Effective Marketing: Compared to traditional advertising, social media marketing is far more affordable, making it an attractive option for businesses of all sizes. Platforms like Instagram and Facebook offer targeted advertising options that allow companies to reach specific demographics without incurring significant costs. This is particularly important for web development and software development companies, where advertising budgets may be constrained by project-based revenue.

Data-Driven Insights: One of the most powerful benefits of social media marketing is the ability to track and measure success. Businesses can monitor performance metrics such as engagement rates, click-through rates, and conversions to gauge how effective their strategies are with the help of their web development company. These insights can then be used to refine future campaigns and make informed decisions.

Overall, by leveraging the right tools, you can create social media ads that drive engagement, increase brand awareness, and ultimately, drive conversions. Whether you’re a small business owner or a seasoned marketer, these essential tools can help you take your social media advertising to the next level.

Docusaurus

This guide instructs you on how to integrate Netlify CMS with Docusaurus.

Before you begin

  • Sign up for GitHub and Netlify.
  • Download Node.js version 14 or above.
  • Install the GitHub CLI.
  • Install and authenticate the Netlify CLI.

Create a new Docusaurus project

# 1. Use Docusaurus to create a site scaffold.
npx create-docusaurus@latest my-website classic

# 2. Run the development server.
cd my-website
npm run start

A browser window opens at http://localhost:3000.

The development server now serves your website at http://localhost:3000. As you edit the source files in /my-website/, you can visit http://localhost:3000 to preview your changes.

Push your project to GitHub

Netlify CMS requires a backend to store content. Netlify CMS supports using Git hosts, like GitHub or GitLab, as backends. This guide uses GitHub.

# 1. Initialize your local Git repository.  
git init

# 2. Rename your initial branch to match GitHub.
git branch -m main

# 3. Stage all your local files to your repository.
git add . 

# 4. Commit your staged changes.
git commit -m 'Initial commit'

# 5. Create a remote repository on GitHub using the GitHub CLI.
gh repo create my-website

Don’t add a license or a .gitignore. Do add an “origin” git remote.

# 6. Update your remote repository with your staged changes. 
git push -u origin main

Publish your project using Netlify CLI

  1. Connect Netlify CLI to your GitHub repository.
    netlify init
  2. Choose Create & configure a new site.
  3. Choose your team and site name.
  4. Choose yarn build for your build command.
  5. Choose build for your deployment directory.

Choose the default option for everything else.

Your website is now deployed. Netlify provides you with a randomly generated domain name. Run netlify open --site to view your deployed site.

Add Netlify CMS to your project

Before you begin

  1. Remove all existing posts from /blog.
    rm -rf ./blog/*
  2. Create a new blog post post titled 2021-11-15-first-blog-post.md.
    touch ./blog/2021-11-15-first-blog-post.md
  3. Edit 2021-11-15-first-blog-post.md to look like this:
    ---
    title: First Blog Post
    slug: first-blog-post
    tags:
      - foo
      - bar
    authors:
      - name: Garrison McMullen
        title: Instruction Writer
        url: https://github.com/garrison0
        image_url: https://avatars.githubusercontent.com/u/4089393?v=4
    ---
    Lorem ipsum dolor sit amet, consectetur adipiscing elit. Pellentesque elementum dignissim ultricies. Fusce rhoncus ipsum tempor eros aliquam consequat.

Procedure

  1. Create an admin directory inside static.
    cd static
    mkdir admin
  2. In the admin directory, create a config.yml file and an index.html file.
    cd admin
    touch config.yml
    touch index.html
  3. Edit index.html to look like this:
    <!doctype html>
    <html>
    <head>
      <meta charset="utf-8" />
      <meta name="viewport" content="width=device-width, initial-scale=1.0" />
      <title>Content Manager</title>
    </head>
    <body>
      <!-- Include the script that builds the page and powers Netlify CMS -->
      <script src="https://unpkg.com/netlify-cms@^2.0.0/dist/netlify-cms.js"></script>
    </body>
    </html>

    index.html displays the Netlify CMS admin interface. You’ll use the admin interface to edit your blog posts.

  4. Edit config.yml to look like this:
    backend:
      name: github
      branch: main 
      repo: <your-github>/my-website
    
    # These lines should *not* be indented
    media_folder: "static/img" # Media files will be stored in the repo under static/images/uploads
    public_folder: "/img/" # The src attribute for uploaded media will begin with /images/uploads
    
    collections:
    - name: blog
      label: "blog"
      folder: blog
      identifier_field: title
      extension: md
      widget: "list"
      create: true
      slug: "{{year}}-{{month}}-{{day}}-{{slug}}" # Filename template, e.g., YYYY-MM-DD-title.md
      fields:
        - { name: title, label: Title, widget: string }
        - { name: body, label: Body, widget: markdown }
        - { name: slug, label: Slug, widget: string }
        - label: "Tags"
          name: "tags"
          widget: "list"
        - label: "Authors"
          name: "authors" 
          widget: "list"
          fields:
            - { name: name, label: Name, widget: string }
            - { name: title, label: Title, widget: string } 
            - { name: url, label: URL, widget: string } 
            - { name: imageUrl, label: ImageURL, widget: string } 

    config.yml specifies what kind of content your blog posts have. The content specification enables Netlify CMS to edit existing posts and create new ones with the same format. To learn more, read about Netlify CMS’ Configuration options.

  5. Visit localhost:3000/adminYou can now view and edit 2021-11-15-first-blog-post.md through the admin interface. You can also create new blog posts.Warning: Any changes you publish through the admin interface will only effect your remote GitHub repository. To retrieve these changes locally, git pull from your local repository.
  6. Commit and push your new changes to your remote repository.
    git add . 
    git commit -m "Add Netlify CMS"
    git push

    Netlify builds and deploys your new changes.

Add GitHub as an authentication provider

Before you can access /admin/ through your Netlify domain, you need to set up an authentication provider. The authentication provider allows Netlify CMS to determine whether users have read and write access to /admin/. This guide uses GitHub credentials for authentication.

Configure GitHub

  1. Create a new GitHub OAuth application.
  2. Enter your Netlify domain as the Homepage URL.
  3. Enter https://api.netlify.com/auth/done as the Authorization callback URL.
  4. Click Register application.
  5. Click Generate a new client secret.
  6. Copy the provided client secret and client ID.

Configure Netlify

  1. On Netlify, under Site Settings > Access control > OAuth > Authentication Providers, click Install provider.
  2. Enter your client secret and client ID from GitHub.
  3. Click Install.

🎉 All done! Now you can access the admin interface through your Netlify URL.